Minikube for Kubeflow
This document will outline steps that will get your local installation of Kubeflow running on top of Mikikube. Minikube runs a simple, single-node Kubernetes cluster inside a virtual machine (VM).
By the end of this document, you’ll have a local installation of Minikube kubernetes cluster along with all the default core components of Kubeflow deployed as services in the pods. You should be able to access JupyterHub notebooks, and the Kubeflow Dashboard.
Prerequisites
- Laptop, Desktop or a Workstation
-
= 12GB RAM
-
= 8 CPU Cores
- ~100GB or more Disk Capacity
- Optional: GPU card
-
- Mac OS X or Linux (Ubuntu/RedHat/CentOS)
- sudo or admin access on the local machine
- Access to an Internet connection with reasonable bandwidth
- A hypervisor such as VirtualBox, Vmware Fusion, KVM etc.
If you already have a hypervisor on your system, you can follow the Quick Setup to do a guided Minikube setup.
Install a Hypervisor
If you do not already have a hypervisor or a virtualizer installed, install a new one. Once the hypervisor is installed, you don’t need to start or use it directly. Minikube will automatically invoke the hypervisor to start the VM.
Mac OS X
Install Virtual Box or VMware Fusion.
Ubuntu
Install Virtual Box or KVM.
The KVM2 driver is intended to replace KVM driver. The KVM2 driver is maintained by the minikube team, and is built, tested and released with minikube. For installing KVM:
# Install libvirt and qemu-kvm on your system, e.g.
# Debian/Ubuntu (for older Debian/Ubuntu versions, you may have to use libvirt-bin instead of libvirt-clients and libvirt-daemon-system)
$ sudo apt install libvirt-clients libvirt-daemon-system qemu-kvm

# Add yourself to the libvirt group so you don't need to sudo
# NOTE: For older Debian/Ubuntu versions change the group to `libvirtd`
$ sudo usermod -a -G libvirt $(whoami)

# Update your current session for the group change to take effect
# NOTE: For older Debian/Ubuntu versions change the group to `libvirtd`
$ newgrp libvirt
Then install the driver itself:
curl -Lo docker-machine-driver-kvm2 https://storage.googleapis.com/minikube/releases/latest/docker-machine-driver-kvm2 \
&& chmod +x docker-machine-driver-kvm2 \
&& sudo cp docker-machine-driver-kvm2 /usr/local/bin/ \
&& rm docker-machine-driver-kvm2
CentOS
Install Virtual Box or KVM.
For installing KVM:
# Install libvirt and qemu-kvm on your system
$ sudo yum install libvirt-daemon-kvm qemu-kvm

# Add yourself to the libvirt group so you don't need to sudo
$ sudo usermod -a -G libvirt $(whoami)

# Update your current session for the group change to take effect
$ newgrp libvirt
Then install the driver itself:
curl -Lo docker-machine-driver-kvm2 https://storage.googleapis.com/minikube/releases/latest/docker-machine-driver-kvm2 \
&& chmod +x docker-machine-driver-kvm2 \
&& sudo cp docker-machine-driver-kvm2 /usr/local/bin/ \
&& rm docker-machine-driver-kvm2
Quick Setup
The following describes a script driven installation that you can use to deploy all
the necessary components including kubectl, minikube, kfctl along with Kubeflow itself. The script requires input from you on some configuration information and then it drives the rest of the installation. Run the following to start the installation:
export KUBEFLOW_TAG=v0.3.0
curl -O https://raw.githubusercontent.com/kubeflow/kubeflow/${KUBEFLOW_TAG}/scripts/setup-minikube.sh
chmod +x setup-minikube.sh
./setup-minikube.sh
KUBEFLOW_TAG is a tag corresponding to the version to checkout such as v0.3.0 or master.
The script asks for some config input as shown below:

Let us consider the example for CPUs configuration. When it asks Assign CPUs between 3..10 [6]: the 3..10 suggest the range of CPU cores available based on your host machine. [6] is the suggested default. You can choose any value within the range and enter the value or just press enter to accept the default value suggested in square brackets. In the image above, we choose the default 6 for CPUs and specified 12GB of memory explicitly. Note that:
- You will need to specify the virtualizer installed on the system explicitly and it needs to be one of the values provided as options.
- If you don’t want to mount any local directory into the JupyterHub simply press enter instead of specifying any path.
After the configuration is complete, the script will continue execution for the next few minutes and when finished successfully should output some like:
When the installation finishes successfully, you can access JupyterHub as described in Where to go next. If you have trouble with the installation script or run into errors, you can follow the detailed installation steps manually as described below.
Install Kubectl
GCloud SDK
$ gcloud components install kubectl
Mac OS X
$ brew install kubectl
Ubuntu
$ sudo apt-get update && sudo apt-get install -y apt-transport-https
$ curl -s https://packages.cloud.google.com/apt/doc/apt-key.gpg | sudo apt-key add -
$ sudo touch /etc/apt/sources.list.d/kubernetes.list
$ echo "deb http://apt.kubernetes.io/ kubernetes-xenial main" | sudo tee -a /etc/apt/sources.list.d/kubernetes.list
$ sudo apt-get update
$ sudo apt-get install -y kubectl
CentOS
$ cat <<EOF > /etc/yum.repos.d/kubernetes.repo
[kubernetes]
name=Kubernetes
baseurl=https://packages.cloud.google.com/yum/repos/kubernetes-el7-x86_64
enabled=1
gpgcheck=1
repo_gpgcheck=1
gpgkey=https://packages.cloud.google.com/yum/doc/yum-key.gpg https://packages.cloud.google.com/yum/doc/rpm-package-key.gpg
EOF

$ sudo yum install -y kubectl
Verify kubectl installed
Try running
$ kubectl version
This should output something like
Client Version: version.Info{Major:"1", Minor:"10", GitVersion:"v1.10.3", GitCommit:"2bba0127d85d5a46ab4b778548be28623b32d0b0", GitTreeState:"clean", BuildDate:"2018-05-21T09:17:39Z", GoVersion:"go1.9.3", Compiler:"gc", Platform:"darwin/amd64"}
Server Version: version.Info{Major:"1", Minor:"10+", GitVersion:"v1.10.7-gke.2", GitCommit:"8d9503f982872112eb283f78cefc6944af640427", GitTreeState:"clean", BuildDate:"2018-09-13T22:19:55Z", GoVersion:"go1.9.3b4", Compiler:"gc", Platform:"linux/amd64"}
Install & Start Minikube
Please see detailed instructions for Minikube installation. For quick setup instructions follow along below.
Mac OS X
$ brew cask install minikube
OR
$ curl -Lo minikube https://storage.googleapis.com/minikube/releases/v0.28.0/minikube-darwin-amd64
$ chmod +x minikube
$ sudo mv minikube /usr/local/bin/
Ubuntu or CentOS
$ curl -Lo minikube https://storage.googleapis.com/minikube/releases/v0.28.0/minikube-linux-amd64
$ chmod +x minikube
$ sudo mv minikube /usr/local/bin/
Start your minikube cluster
$ minikube start --cpus 4 --memory 8096 --disk-size=40g
This takes a couple minutes as it will talk to the hypervisor and create a VM with the specified configuration.
Notes:
- These are the minimum recommended settings on the VM created by minikube for kubeflow deployment. You are free to adjust them higher based on your host machine capabilities and workload requirements.
- Using certain hypervisors might require you to set –vm-driver option specifying the driver you want to use.
In case, you have the default minikube VM already created (following detailed installation instructions), please use the following to update the VM.
$ minikube stop
$ minikube delete
$ minikube start --cpus 4 --memory 8096 --disk-size=40g
Installing Kubeflow using kfctl
The following steps will deploy Kubeflow components and start them on the Minikube you created above.
- Download Kubeflow source
```
mkdir ${KUBEFLOW_SRC}
cd ${KUBEFLOW_SRC}
export KUBEFLOW_TAG=v0.3.0
curl https://raw.githubusercontent.com/kubeflow/kubeflow/${KUBEFLOW_TAG}/scripts/download.sh | bash
```
- **KUBEFLOW_SRC** is the directory where you want to download the source
- **KUBEFLOW_TAG** is a tag corresponding to the version to checkout such as `v0.3.0`
- Run the following to setup and deploy Kubeflow:
```
KUBEFLOW_REPO=${KUBEFLOW_SRC} ${KUBEFLOW_SRC}/scripts/kfctl.sh init ${KFAPP} --platform minikube
cd ${KFAPP}
${KUBEFLOW_SRC}/scripts/kfctl.sh generate all
${KUBEFLOW_SRC}/scripts/kfctl.sh apply all
```
- **KFAPP** is the name of a directory to store your configs. This directory is created when you run init.  Please see [understanding the deployment process](/docs/started/getting-started-gke/#understanding-the-deployment-process) for more details.
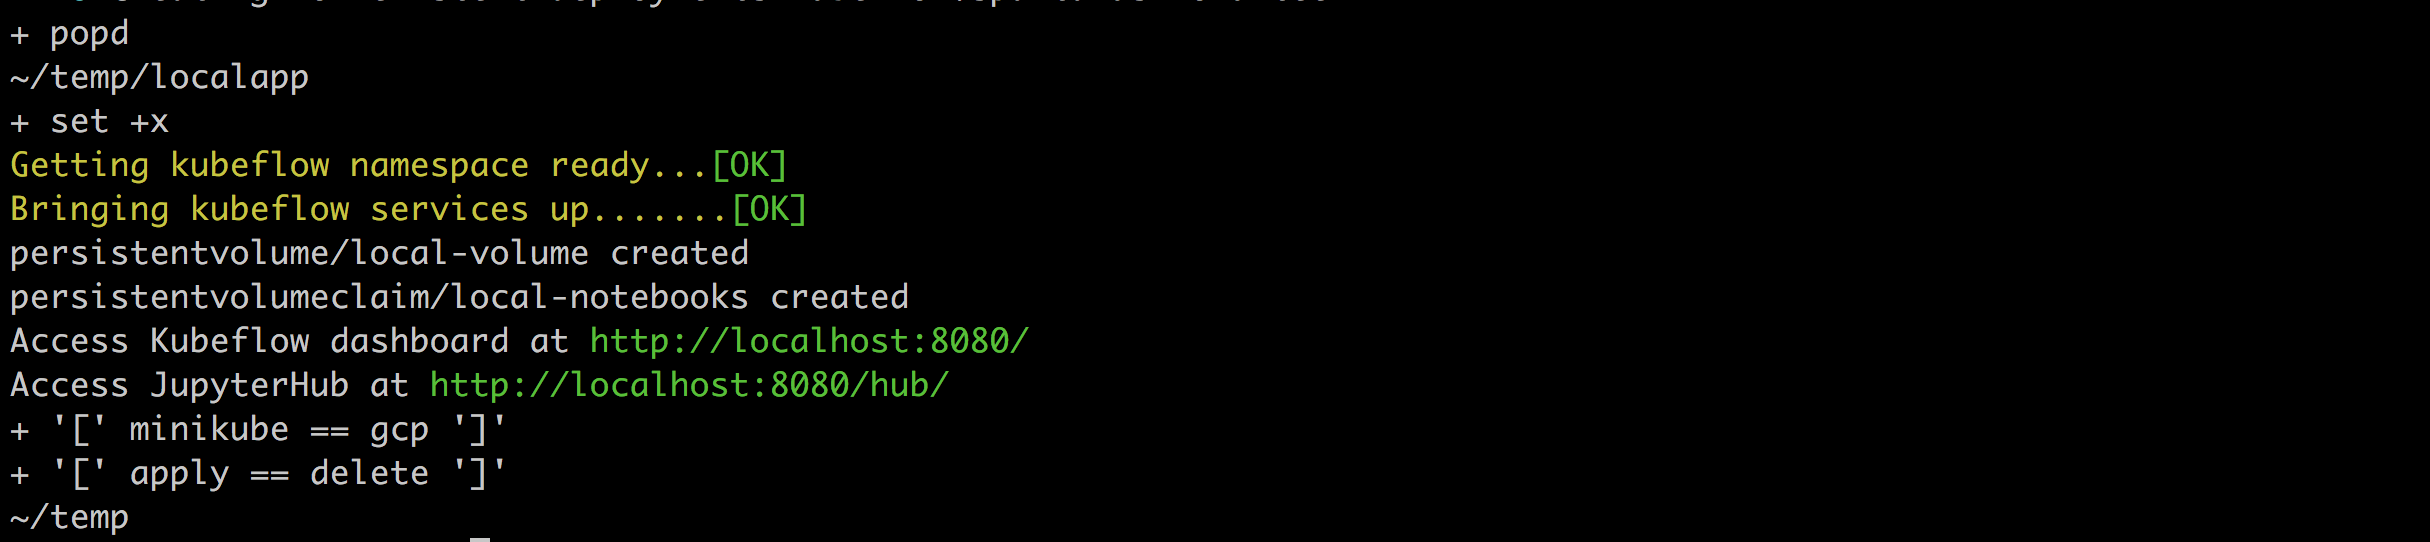
The above installation may take a few minutes. At the end of the installation you should see:
Access Kubeflow dashboard at http://localhost:8080/
Access JupyterHub at http://localhost:8080/hub/
Where to go next
Now you can access the Kubeflow dashboard at http://localhost:8080/ and JupyterHub at http://localhost:8080/hub/. For JupyterHub, you’ll be landing on a login page.
- Use any username and password to login
- Pick an available CPU tensorflow image
- Provide at least 2 CPUs
- Provide 4Gi for the memory
- Leave “Extra Resource Limits” alone for now
- Click Spawn.
- You should be redirected to a page that waits while the server is starting.
If the page doesn’t refresh, please see troubleshooting.
For further exploration refer to the guide.