Istio Integration (for TF Serving)
Istio provides a lot of functionality that we want to have, such as metrics, auth and quota, rollout and A/B testing. We have an issue to track the progress.
Install Istio
Follow the istio doc to install istio. After the installation, you should see services istio-pilot and istio-mixer in namespace istio-system.
Install and configure istio sidecar injector
We are using automatic sidecar injection. This requires Kubernetes 1.9 or above.
Follow the doc to install the secret and configmap. Install the CA secret:
./install/kubernetes/webhook-create-signed-cert.sh \
    --service istio-sidecar-injector \
    --namespace istio-system \
    --secret sidecar-injector-certs
Before applying the configmap, we are going to make some change.
By default, the sidecar injector is “enabled” and all pods in certain namespace will be injected. We want the opposite that the sidecar is only injected when we explicitly add some annotation.
- Change
install/kubernetes/istio-sidecar-injector-configmap-release.yamlso that the policy (the first line of config) is “disabled”.
Istio by default denies all egress traffic. This is to allow egress traffic for GCP. If you are on other cloud, check here.
- For arguments of the initContainer istio-init: after “-u 1337”, add “-i 10.4.0.0/14,10.7.240.0/20”.
Apply the configmap:
kubectl apply -f install/kubernetes/istio-sidecar-injector-configmap-release.yaml
Install the injector:
cat install/kubernetes/istio-sidecar-injector.yaml | \
     ./install/kubernetes/webhook-patch-ca-bundle.sh > \
     install/kubernetes/istio-sidecar-injector-with-ca-bundle.yaml

kubectl apply -f install/kubernetes/istio-sidecar-injector-with-ca-bundle.yaml
The injector will inject the istio sidecar to all the pods if both conditions are true
- the namespace has label: “istio-injection=enabled”
- the deployment has annotation “sidecar.istio.io/inject: true”
Therefore, label the namespace of kubeflow deployment:
kubectl label namespace ${NAMESPACE} istio-injection=enabled
Kubeflow TF Serving with Istio
Istio by default denies egress traffic. Since TF serving component might need to read model files from outside (GCS, S3 etc), we need some cloud-specific setting. Currently it’s for GCP only.
After installing Istio, we can deploy the TF Serving component as in README with additional params:
ks param set --env=cloud ${MODEL_COMPONENT} deployIstio true
This will inject an istio sidecar in the TF serving deployment.
Metrics
The istio sidecar reports data to Mixer. We can view the istio dashboard by installing Grafana. Execute the command:
kubectl -n istio-system port-forward $(kubectl -n istio-system get pod -l app=grafana -o jsonpath='{.items[0].metadata.name}') 3000:3000 &
Visit http://localhost:3000/dashboard/db/istio-dashboard in your web browser.
Send some requests to the TF serving service, then there should be some data (QPS, success rate, latency)
like
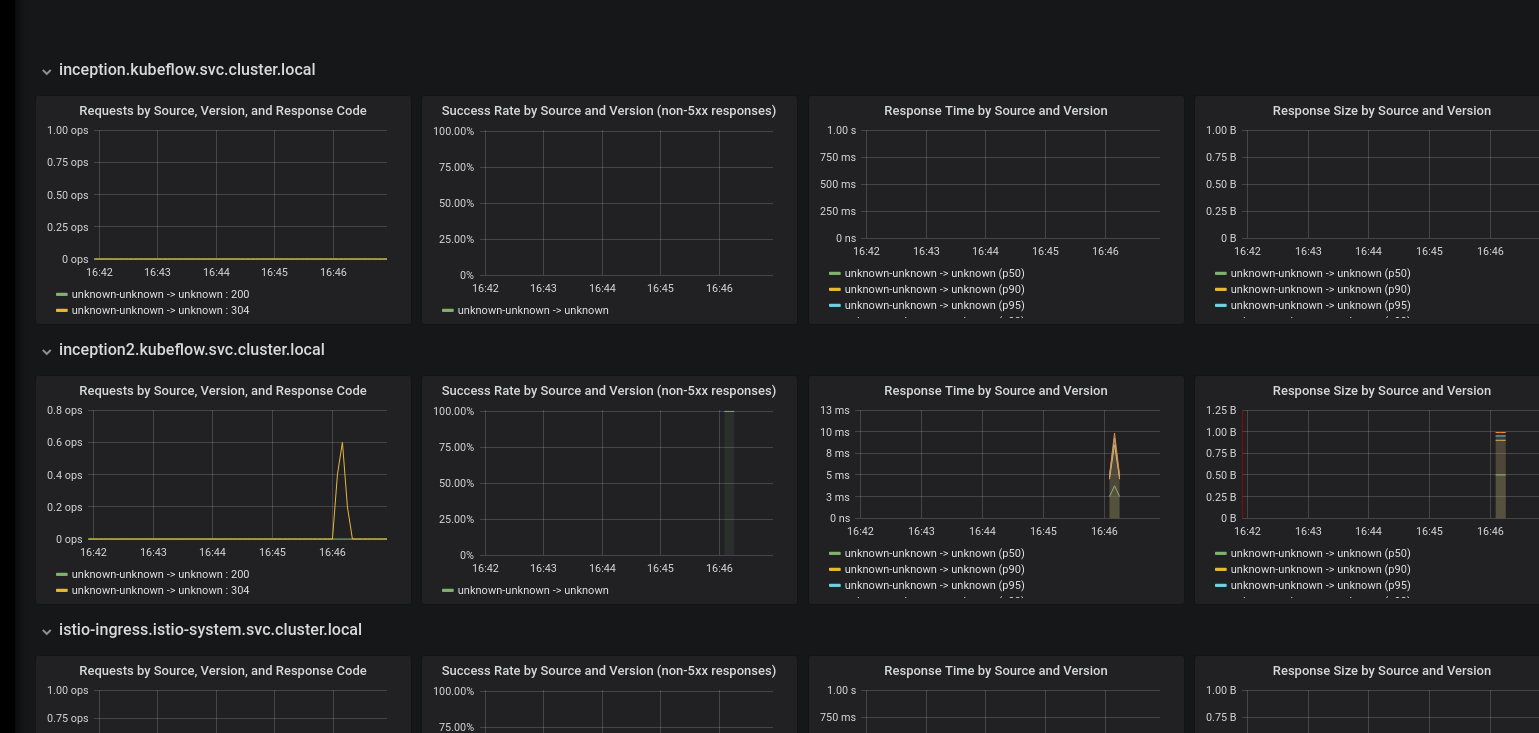
Define and view metrics
See istio doc.
Expose Grafana dashboard behind ingress/IAP
To expose the grafana dashboard as, e.g. YOUR_HOST/grafana, follow these steps.
- Add ambassador annotation for routing. However, since ambassador only scans the service within
its namespace,
we can add the annotation for grafana service in ambassador service. So do
kubectl edit svc -n kubeflow ambassador, and add annotation
getambassador.io/config: |
  ---
  apiVersion: ambassador/v0
  kind:  Mapping
  name:  grafana_dashboard_mapping
  prefix: /grafana/
  service: grafana.istio-system:3000
- Grafana needs to be configured
to work properly behind a reverse proxy. We can override the default config using
environment variable.
So do
kubectl edit deploy -n istio-system grafana, and add env vars
- name: GF_SERVER_DOMAIN
  value: YOUR_HOST
- name: GF_SERVER_ROOT_URL
  value: '%(protocol)s://%(domain)s:/grafana'
Rolling out new model
A typical scenario is that we first deploy a model A. Then we develop another model B, and we want to deploy it and gradually move traffic from A to B. This can be achieved using Istio’s traffic routing.
- Deploy the first model as usual, with name X. We can optionally set the version param, which
default to
v1. After doingks apply, we will have a service X, and a deploymentX-v1. In addition, a default routing rule is created and routes all requests tov1. - When we want to rollout the new model, use the same name X and set a different version, e.g.
v2.
ks param set --env=$ENV $MODEL_COMPONENT version v2
ks param set --env=$ENV $MODEL_COMPONENT firstVersion false
ks apply $ENV -c $MODEL_COMPONENT
This deploys the new deployment X-v2, but the traffic will still go to v1
3. Create the new routing rule. For example, the following sends 5% traffic to v2.
apiVersion: config.istio.io/v1alpha2
kind: RouteRule
metadata:
  name: inception-rollout
  namespace: kubeflow
spec:
  destination:
    name: inception
  precedence: 2
  route:
  - labels:
      version: v1
    weight: 95
  - labels:
      version: v2
    weight: 5