Kubernetes Engine for Kubeflow
This guide is a quickstart to deploying Kubeflow on Google Kubernetes Engine (GKE).
Advantages of Kubeflow on GKE
Running Kubeflow on GKE brings the following advantages:
- We use Deployment Manager to declaratively manage all non K8s resources (including the Kubernetes Engine cluster), which is easy to customize for your particular use case
- You can take advantage of Kubernetes Engine autoscaling to scale your cluster horizontally and vertically to meet the demands of ML workloads with large resource requirements
- Cloud Identity-Aware Proxy (Cloud IAP) makes it easy to securely connect to Jupyter and other web apps running as part of Kubeflow
- Stackdriver makes it easy to persist logs to aid in debugging and troubleshooting
- GPUs and TPUs can be used to accelerate your work
Create oauth client credentials
Create an OAuth client ID to be used to identify Cloud IAP when requesting access to user’s email to verify their identity.
-
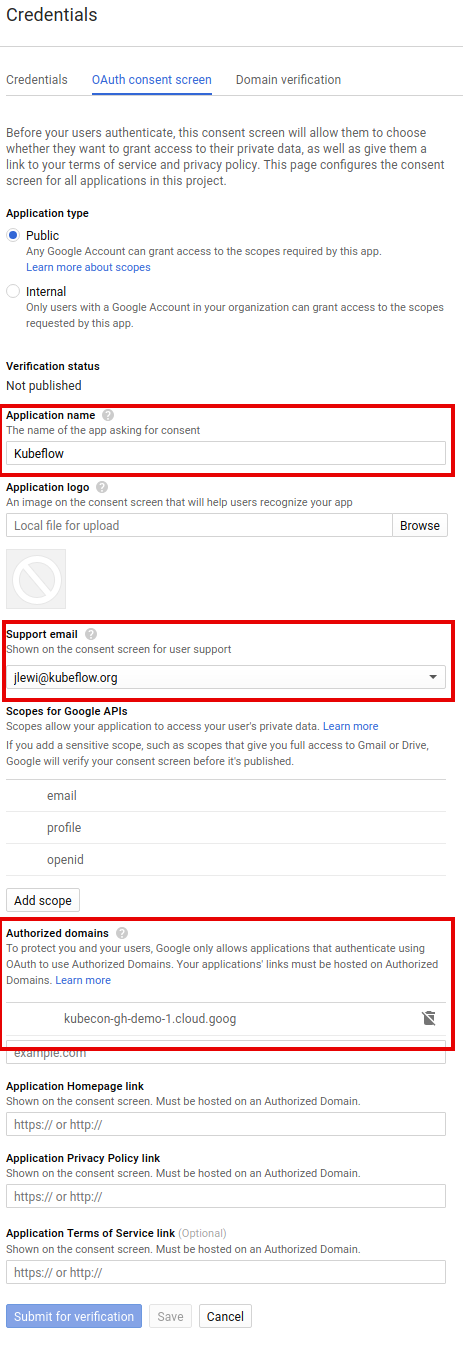
Set up your OAuth consent screen:
-
Configure the consent screen.
-
Under Email address, select the address that you want to display as a public contact. You must use either your email address or a Google Group that you own.
-
In the Product name box, enter a suitable name like
kubeflow. -
If you see Authorized domains, enter
<project>.cloud.goog- where <project> is your Google Cloud Platform (GCP) project ID.
- If you are using your own domain e.g. acme.com you should add that as well
- The Authorized domains option appears only for certain project configurations. If you don’t see the option, then there’s nothing you need to set.
-
Click Save.
-
Here’s a screenshot
-
-
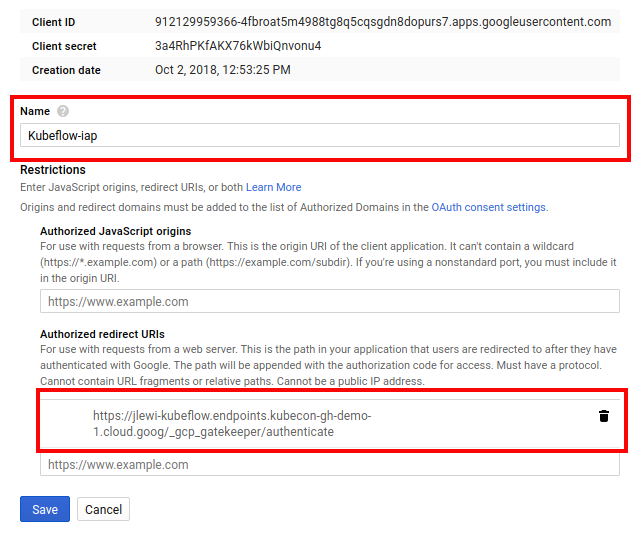
On the Credentials screen:
-
Click Create credentials, and then click OAuth client ID.
-
Under Application type, select Web application.
-
In the Name box enter any name.
-
In the Authorized redirect URIs box, enter the following:
https://<name>.endpoints.<project>.cloud.goog/_gcp_gatekeeper/authenticate<name>and<project>must have the same values as set in the next step when you run the deployment script.- The deployment uses “kubeflow” by default for
<name>but you can configure this with the environment variableDEPLOYMENT_NAME. <project>is your GCP project.
-
Here’s what the form should look like
-
-
Click Create.
-
Make note of the client ID and client secret that appear in the OAuth client window. You need them later to enable Cloud IAP.
-
Create environment variables from the OAuth client ID and secret:
export CLIENT_ID=<CLIENT_ID from OAuth page>
export CLIENT_SECRET=<CLIENT_SECRET from OAuth page>
Deploy Kubeflow on Kubernetes Engine
Run the following steps to deploy Kubeflow:
-
Run the following script to download
kfctl.sh:mkdir ${KUBEFLOW_SRC} cd ${KUBEFLOW_SRC} export KUBEFLOW_TAG=<a href="https://github.com/kubeflow/kubeflow/releases/tag/v0.3.0">v0.3.0</a> curl https://raw.githubusercontent.com/kubeflow/kubeflow/${KUBEFLOW_TAG}/scripts/download.sh | bash- KUBEFLOW_SRC directory where you want to download the source to
- KUBEFLOW_TAG a tag corresponding to the version to checkout such as
masterfor latest code. - Note you can also just clone the repository using git.
-
Run the following scripts to set up and deploy Kubeflow:
${KUBEFLOW_REPO}/scripts/kfctl.sh init ${KFAPP} --platform gcp --project ${PROJECT} cd ${KFAPP} ${KUBEFLOW_REPO}/scripts/kfctl.sh generate platform ${KUBEFLOW_REPO}/scripts/kfctl.sh apply platform ${KUBEFLOW_REPO}/scripts/kfctl.sh generate k8s ${KUBEFLOW_REPO}/scripts/kfctl.sh apply k8s- ${KFAPP} The name of a directory to store your configs. This directory will be created when you run init.
- The contents of this directory are described in the next section.
- ${KFAPP} The name of a directory to store your configs. This directory will be created when you run init.
-
Check resources deployed in namespace
kubeflow:kubectl -n kubeflow get all -
Kubeflow will be available at the following URI:
https://<name>.endpoints.<project>.cloud.goog/- It can take 10-15 minutes for the endpoint to become available.
- Kubeflow needs to provision a signed SSL certificate and register a DNS name.
- If you own/manage the domain or a subdomain with Cloud DNS then you can configure this process to be much faster.
- While you wait you can access Kubeflow services by using
kubectl proxyandkubectl port-forwardto connect to services in the cluster.
- It can take 10-15 minutes for the endpoint to become available.
-
We recommend checking in the contents of ${KFAPP} into source control.
-
To delete your deployment and reclaim all resources:
cd ${KFAPP}
${KUBEFLOW_REPO}/scripts/kfctl.sh delete all
Understanding the deployment process
The deployment process is controlled by 4 different commands:
- init - one time setup.
- generate - Creates config files defining the different resources.
- apply - Create or update the resources.
- delete - Delete the resources.
With the exception of init, all commands take an argument which describes the
set of resources to apply the command to; this argument can be one of the
following:
- platform - All GCP resources; that is, anything that doesn’t run on Kubernetes.
- k8s - All resources that run on Kubernetes.
- all - GCP and Kubernetes resources.
App layout
Your Kubeflow app directory contains the following files and directories:
-
env.sh defines several environment variables related to your Kubeflow deployment.
- The values are set when you run
init. - The values are snapshotted inside env.sh to make your app self contained.
- The values are set when you run
-
${KFAPP}/gcp_config is a directory that contains Deployment Manager config Files defining your GCP infrastructure.
- The directory is created when you run
kfctl.sh generate platform. - You can modify these configs to customize your GCP infrastructure.
- The directory is created when you run
-
${KFAPP}/k8s_specs is a directory that contains YAML specs for some daemons deployed on your Kubernetes Engine cluster.
-
${KFAPP}/ks_app is a directory that contains the ksonnet application for Kubeflow.
- The directory is created when you run
kfctl.sh generate k8s. - You can use ksonnet to customize Kubeflow.
- The directory is created when you run
GCP service accounts
Creating a deployment using kfctl.sh creates three service accounts in the GCP project. These service accounts are created using the principle of least privilege. The three service accounts are:
${KFAPP}-admin${KFAPP}-user${KFAPP}-vm
${KFAPP}-admin is used for some admin tasks like configuring the load balancers. The idea here is that it’s needed to deploy Kubeflow but not needed to actually run jobs.
${KFAPP}-user is intended to be used by training jobs and models to access GCP resources (GCS, BigQuery, etc…). It has a much smaller set of privileges compared to admin.
${KFAPP}-vm is used only for the VM service account. It has minimal permissions to send metrics and logs to Stackdriver.
Next steps
See how to customize or troubleshoot your Kubeflow deployment on GKE.